
BLOG REVIT
Settaggi Mental RAY (INGLESE) – DA HOKBIM SOLUTION

12
Mar
Mar
Rendering soft shadows in Revit 2009/2010
I came across this tip from one of the Autodesk Revit development QA guys, Zach Kron and I thought it was worth sharing, I’ve expanded a little on Zach’s original post, however Zach owns the credit.
This will work in both Revit 2009 and 2010. Below you will see a render of a form which utilises soft shadow, giving the image a slightly different look compared with the default out of the box render settings. Whether you like this look is a matter of opinion, but it is certainly provides something a bit different.
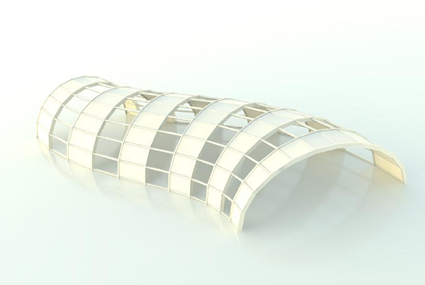

You achieve this result by setting the Revit Mental Ray render engine to an early morning setting of say 2am and then adjusting the exposure control from 14 to between 2 to 2.5. You can always tweak it further using the Adjust exposure once you completed the render ( more on that later).
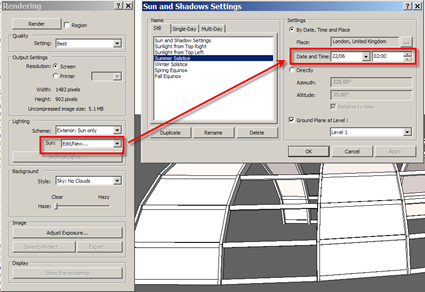
Setup your scene in the normal manner. Then open up the render dialogue window; make sure your Lighting scheme is set to “Exterior:Sun only”. Next, edit your Sun settings to something like 2am in the morning.
Under image, click Adjust Exposure, this will open up the Exposure Control dialogue. Set the Exposure Value your from 14 to around 2 to 2.5. The image above had an exposure setting of 2.2.

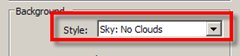
Also, make sure the Background Style equals Sky: No Clouds.
What this actually does, is turns off the sun (as its night time ), but keeps the sky image map and the low level ambient lighting. As noted by Zach, to achieve the best results, it’s worth setting your render quality to “best” to get the best shadow depth you can. Setting your render to “best” will obviously result in long render times, so it’s probably worth doing a few low resolution renders in the first instance to be assured that the settings will work for you.
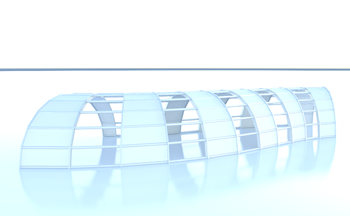
Once you’ve rendered your image, you can also play with the exposure settings in realtime to again adjust the look and feel of the image. Using the settings above, this is what the image looks like with a White Point setting of 4000 and a saturation set to 1:-
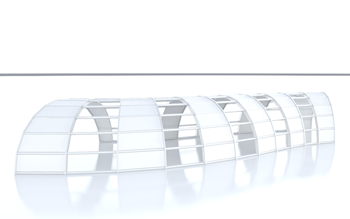
Adjusting the White point to 4000 and saturation to 0.2 gave this look:-
The same image has then had all the exposure control settings adjusted, giving these results:-
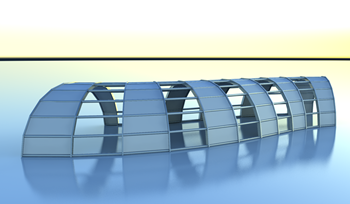
Exposure Value:2.2
Highlights:0.07
Mid Tones:0.3
Shadows:0.8
White Point:4440
Saturation:1.08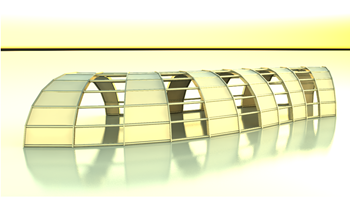
Exposure Value:2.2
Highlights:0.25
Mid Tones:0.3
Shadows:0.8
White Point:7080
Saturation:1.08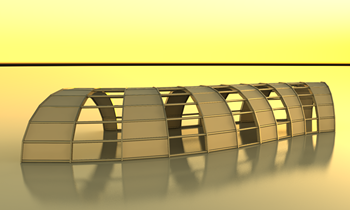
Exposure Value:2.2
Highlights:0.07
Mid Tones:0.3
Shadows:2.581
White Point:9548.4
Saturation:1.08
Setup your scene in the normal manner. Then open up the render dialogue window; make sure your Lighting scheme is set to “Exterior:Sun only”. Next, edit your Sun settings to something like 2am in the morning.

Under image, click Adjust Exposure, this will open up the Exposure Control dialogue. Set the Exposure Value your from 14 to around 2 to 2.5. The image above had an exposure setting of 2.2.

Also, make sure the Background Style equals Sky: No Clouds.

What this actually does, is turns off the sun (as its night time ), but keeps the sky image map and the low level ambient lighting. As noted by Zach, to achieve the best results, it’s worth setting your render quality to “best” to get the best shadow depth you can. Setting your render to “best” will obviously result in long render times, so it’s probably worth doing a few low resolution renders in the first instance to be assured that the settings will work for you.
Once you’ve rendered your image, you can also play with the exposure settings in realtime to again adjust the look and feel of the image. Using the settings above, this is what the image looks like with a White Point setting of 4000 and a saturation set to 1:-

Adjusting the White point to 4000 and saturation to 0.2 gave this look:-

The same image has then had all the exposure control settings adjusted, giving these results:-

Exposure Value:2.2
Highlights:0.07
Mid Tones:0.3
Shadows:0.8
White Point:4440
Saturation:1.08

Exposure Value:2.2
Highlights:0.25
Mid Tones:0.3
Shadows:0.8
White Point:7080
Saturation:1.08

Exposure Value:2.2
Highlights:0.07
Mid Tones:0.3
Shadows:2.581
White Point:9548.4
Saturation:1.08
Posted by David Light at 5/07/2009